🎲 Mold your own legend—dice crafting just leveled up!
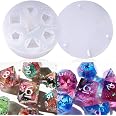
LET'S RESIN Dice Resin Molds offer a premium 7-piece polyhedral silicone set designed for epoxy resin crafting. Featuring a one-piece design with clear etched numbers, these flexible, reusable molds produce smooth, polished dice with minimal effort. Ideal for DND enthusiasts and DIY creators seeking professional-quality dice with easy bubble control and a satisfaction guarantee.


S**O
Good Option for Beginners (It's me. I'm beginners.)
TLDR Version for the ADHDers: There's not one for this one, fam. Read all the words.First you need to know that I have never done any resin work before this and we got into this just to make dice for my son. With that also goes a certain acceptable quality level for the finished product as we were willing to accept some imperfections that I wouldn't be willing to accept if I paid for the dice.The boring stuff - it's nicely packaged and clean. The dice are easy to pop out when they've cured, though you do have to take the resin out of the reservoirs that are in place around the dice with more complex shapes. If you don't pop the cured resin out of the reservoirs before trying to pop out the die in that part of the mold, I think you could run the risk of tearing up the mold. Anyway, not a big thing. I actually like to take that reservoir resin out and use it to know when the resin is cured enough for me to safely remove them.Now what you really came for - the bubbles. Beginner here (a VERY craft one, though), and I don't think you are going to get all the bubbles out without a pressure pot. I just don't. I read through the comments before purchasing so I knew some of the tricks to try to get rid of the bubbles, but the first couple of runs that I did on this mold I still had some large bubbles that nestled in points and corners - those ruin the dice in my opinion.This is my beginner with not a lot of tools and equipment process:1. Mix resin fully, add whatever colors you're planning to add, then let sit for a bit next to something that vibrates (to get bubbles out). I use a jewelry cleaner, but yeah - whatever you choose is up to you........ How long you let the resin sit depends on what resin you're using and how long it's workable, but mine is workable for up to 40 minutes and I let it sit for about 25 before pouring into the mold.2. Spoon off any surface bubbles from resin, then slowly pour each mold about 1/3 full.3. Take a plastic toothpick and slowly run it through the corners, edges, and points.4. Fill to 2/3 and repeat the toothpick scrape.5. Fill to top - overpour - and repeat toothpick scrape6. THIS IS IMPORTANT - run the toothpick around the top inside lips of the more enclosed dice to free the bubbles.7. Let sit for a few minutes, using a toothpick to guide any bubbles off the side of the mold.8. While it is sitting, take the lid of the mold and place a little resin on each of the numbers, watch for bubbles, remove them.....9. As it gets tacky, you're going to roll the top onto the mold - pushing the overpour and bubbles off the side of the mold. I start over the 20 sided and slowly, firmly press as I roll the top down over the mold. Careful not to lift it or create any bubbles. Keep firm pressure on the mold.10. Look through the top of the mold for any trapped bubbles. If you see any, stick a plastic toothpick in through the lid and mold and rake the bubbles out.11. Put something heavy on the mold and let it cure. I use a concrete tabletop firepit (see picture).When I demold, I clean up the edges a little but, but otherwise they come out ready to go. My son paints the numbers in with acrylic and he's off to do some dungeoning and dragoning. Rawr.
S**N
Well made! Fantastic results
The media could not be loaded. This is absolutely an amazing mold! With a little technique, you can easily get an excellent D20 container, orgiant liquid core Di.Here are my recommendations:Warm the liquid resin after mixing to about 1oo degrees, and pour in layers.Start with about 6 ounces of mixed resin. I used a 1:1 ratio resin and did 3 ounces of part A and then another 3 of part B.1) Fill the lid to where the corners are, and not to the top of the lid. At the same time make your first pour into the body, filling that to just before the line where you will be connecting the what will be the bottom of the dice (the silicone piece with the plug in it is what I am referring to as the bottom)2) squeeze around the corners of the lid and push any air bubbles out. This is why you don't want to fill this part all the way first. Otherwise you will make a mess when squeezing out any bubbles trapped in the corners.3) Remove the plug from the bottom piece and attach onto the body of the mold. There is a pull tab on one lip of the bottom that aligns with a corresponding gap on side of the lip around the edge of the body of the mold. Use a hot glue gun to seal around the edges where the bottom and body of the mold meets. (I put a picture of what this looks like with the review)4) make up another 6 oz of resin and heat to about 100 degrees (heating helps with removing bubbles). Have a needle or pin handy. Now you can tp off the lid of the mold, then start SLOWLY pouring the resin into the hole provided into your now assembled body and bottom mold piece. The needle is for poking into the hole anytime the resin blocks the hole, which it may during the pour, especially if you are pouring inclusions into the mold like the gold foil I Used. I would NOT recommend putting the plug into the mold.5) wait about 30 minutes for the resin to settle and bubbles to pop, then make another 2 of of resin and bring to temp. Use this to tip off the body of the mold as the resin settles and bubbles rise. I would check the mold every 15 minutes or so and add mor3 resin as needed until it it done settling. Even with quicker curing resin, I would recommend waiting at least a full 24 hours before attempting to demold.I know that seems involved, but you get great results with a little planning and care. I did have a pressure pot, however it is small and these are not so easily movable into said pot once filled. Plus, they came out fine without the pot.I hope this helps anyone wanting to try this out!
F**R
D & D makes the dice awesome
Top numbers don't always come out right
Z**Z
Makes awesome dice boxes!
This is the COOLEST dice box mould ever! Its heavy duty silicone is quite sturdy. Use a DEEP POUR resin or you can use regular resin if you pour it in layers. I absolutely love how the boxes came out when finished curing! I’m going to get another so I can make multiples of these to sell at craft fairs! They will be a favorite of dice lovers and gamers alike!
C**E
Larger dice than expected
The mold is okay. I used it for the first time and they look like how they should (the blue dice in the image). However my beef about it is they’re larger than I expected. Maybe that’s my fault for not paying closer attention. But these are LET’S RESIN brand. I also purchased a dice box (the dagger LET’S RESIN brand) and these dice don’t fit in it. I was going to make dice and a box to sell/give as gifts as a set but the dice are too big for it. So now I’m on a hunt for a smaller set.Also, for those who don’t care about the size and just want the dice, just be patient while making these. I haven’t figured it out yet to completely avoid bubbles, but to start, you have to put the top on slow, and slowly law one end down to the other, ensuring you get those bubbles out, or they’re gonna look like this.
Trustpilot
2 weeks ago
1 week ago